Most men are accustomed to the fact that the boots or classic shoes they buy are already laced up by the manufacturer. As a rule, this is an uncomplicated Crest-to-Cross method. Meanwhile, there are many ways of lacing that will allow you to slightly diversify your masculine style.
We have selected 6 of the best ways to lace up your shoes and have drawn diagrams to help you learn in detail how to tie your shoes.
6 ways to tie your shoelaces
As I already mentioned, the most popular method of lacing shoes is the classic Crest-to-Cross. Its popularity lies in the simplicity and uncomplicatedness of the weaving of laces. I think that this method will “reign supreme” for a long time. Well, we will try to learn something new and learn how to tie the shoelaces beautifully. For example, lace up shoes with the Straight method or the Cross over and under. Both methods are quite simple and only slightly more complicated than the classic Crest-to-Cross.
Next, we will learn how to tie shoelaces using the Diagonal Method. This method allows the shoe to be laced up in the same way or mirrored on both boots. Do you like minimalism? Then you can lace up your shoes with the Reverse method (also called Military lacing), where the laces are almost invisible. And the hardest way to tie your shoelaces is with a Lattice.
They say shoes make a person. In this case, interesting lacing will say a little more about you.
Method 1. Cross-to-cross lacing
Every child knows the traditional way of lacing shoes Crest-to-cross. It is simple, functional and versatile enough. If you are a practical person, this is the best choice for you. The method is time-tested and will fit any men's classic shoes.

How to tie your shoelaces using the Crisscross method:
- The lace is passed through the bottom holes of the shoe from the inside and outward from both sides. It is important that the laces are the same length at this stage.
- Take one end of the lace and thread it through the next empty opposite hole.
- Repeat the operation with the second lace. You should now have a crisp laces.
- Continue this simple operation to the very top holes.
Method 2. Diagonal lacing
The diagonal method of lacing men's shoes looks fresh and attractive. After both boots are laced up, a rather interesting diagonal pattern is obtained. It can be either the same or mirrored on a pair of shoes.

How to tie shoelaces using the Diagonal Method:
- Pass the lace through the bottom holes on one side from the inside and the other from the outside. The side that went through from the inside will be visible on your boot, and the other will not. It is important that the laces are the same length at this stage.
- Next, take the end that will be visible and thread it into the next, opposite side so that the end enters from the outside, not the inside.
- Pass the other end (which will not be visible) through the next opposite hole from the inside. Note that in this step, the side that was not visible will be outside the boot.
- Continue to the top holes, alternating between the visible and invisible sides of the lace.
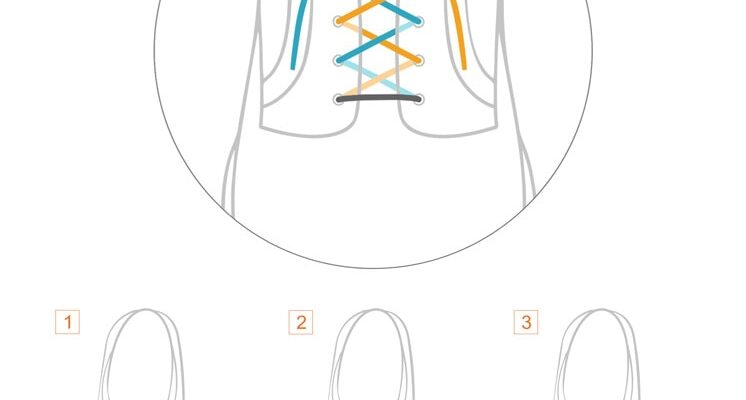
Method 3. Lacing Cross over under
As the name implies, after lacing the boots, you will have an alternating cross OVER the boots and UNDER the boots. This method works best on boots with 5 or 6 holes on each side. Quite a fun way to lace up, especially if you have classic Oxfords.

How to tie your shoelaces using the Cross Over Method:
The first thing to determine is how many OVER crosses you will get. If you have up to 4 holes, then you get only one full cross. If you have 5 or more holes, then you will get 2 or more crosses OVER the ankle boots.
If you have 3 holes:
- Thread the lace from the inside with both ends coming out from the inside, it is important that the laces are the same length during this step.
- Next, cross the laces and thread them into opposite holes from the outside so that a visible cross is formed.
- Next, do the same as in the previous step, only this time you will have an invisible cross UNDER the ankle boots.
If you have 4 holes:
- Thread the lace from the outside so that both ends go in. It is important that the laces are the same length during this step.
- Next, cross the laces and thread them into opposite holes from the inside so that an invisible cross is formed.
- Next, do the same as in the previous step, only this time you will have a visible cross OVER the ankle boots.
- The next cross will be invisible, after lacing which both ends will come out from the inside out.
If you have 5 or more holes:
- Thread the lace from the inside with both ends coming out from the inside, it is important that the laces are the same length during this step.
- Next, cross the laces and thread them into opposite holes from the outside so that a visible cross is formed.
- Next, do the same as in the previous step, only this time you will have an invisible cross UNDER the ankle boots.
- Repeat both previous steps and you should have 2 visible and 2 invisible crosses (if 5 holes).
Method 4. Straight lacing
Straight lacing allows you to lace up your shoes in parallel lines, which look pretty unusual on any classic shoe. On the one hand, lace-up shoes look 'light', on the other hand they look attractive. The straight method is interesting with any number of lace holes. The only inconvenience is the difficulty of tightening the laces, especially if the shoe fits snugly on the foot.

How to tie shoelaces Direct method:
- Thread the lace from the outside so that both ends go in. It is important that the laces are the same length during this step.
- Take the left lace in your hand and thread it from the inside out into the next hole on the same side of the row of holes.
- Take the right lace in your hand and thread it through 1 hole from the inside out on the same row.
- Next, take the left lace in your hand and thread it from top to bottom into a strictly parallel hole on the next row.
- Take the right lace and repeat the same action as in the previous step. You should have 3 parallel lines that are formed by the laces.
- All other holes must be laced up exactly in this sequence until you reach the last row.
Method 5. Reverse or Military lacing
If you love minimalism in all its forms, then I can recommend you to lace up your shoes with the Reverse or Military method. The last name, this method of lacing was received due to its practical application in many armies of the European Union countries.

How to tie shoelaces with the Reverse or Military method:
- Thread the lace from the outside so that both ends go in. It is important that the laces are the same length during this step.
- Cross both ends of the lace and thread from inside to outside into the following empty holes. You should get an invisible cross.
- Next, take the left end and thread it into the next hole in the same row from top to inside.
- Do the same operation with the second end.
- Next, cross the laces and thread them through the next opposite empty holes to create an invisible cross.
- Repeat steps 3 and 4.
Continue lacing your shoes until you reach the top holes.
Method 6. Lattice
The last method that we will consider is the most difficult. However, if you have the patience, you will end up with a very unusual drawing that will appeal to many. Note that grill lacing works best on shoes with 6 holes.

How to tie shoelaces using the Lattice method:
If you have 4 holes:
- Thread the lace from the inside with both ends coming out from the inside, it is important that the laces are the same length during this step.
- Cross both ends of the lace and thread from top to inside through one empty hole.
- Next, take one of the laces and thread the hole you missed in step 2 from the inside and pull it out.
- Repeat step # 3 with the second lace hole.
- The final step is to thread both ends from the inside to the outside in the last holes, after crossing the ends.
If you have 5 holes:
- Thread the lace from the inside with both ends coming out from the inside, it is important that the laces are the same length during this step.
- Cross both ends of the lace and thread from top to inside through one empty hole.
- Next, take one of the laces and thread the hole you missed in step 2 from the inside and pull it out.
- Repeat step # 3 with the second lace hole.
- Thread the ends from outside to inside.
- Take the left end and thread it into the next hole in the same row from the inside out.
- Repeat the previous step with the second end.
If you have 6 holes (recommended):
At the moment of lacing, try to weave the ends in a 'lattice' pattern, according to the principle: once from above, once from below …. once from above, once from below.
- Thread the lace from the inside with both ends coming out from the inside, it is important that the laces are the same length during this step.
- Cross both ends of the lace and thread from top to inside through the two empty holes.
- Take the left end and thread it into the next hole in the same row from the inside out.
- Repeat the previous step with the second end.
- Take the left end and thread it into the second (empty) opposite hole that you skipped in step 2.
- Repeat the previous step with the second mirrored end.
- Take the left end and thread it into the next hole (third from the bottom) in the same row from the inside out.
- Repeat the previous step with the second end.
- Insert both ends from the inside out into the last top holes.
Lace-up shoes – photo
 Straight Lace Up Brogues
  Classic shoes laced up in different ways
  Classic men's shoes tied with a criss-cross method
  Laces tied using the Cross over and under