Users of the game service Valve Corp. face the error loading the dynamic library SteamUI.dll. Our experts figured out the problem and offer several options for solving it.
General settings
Method number 1 to eliminate the error Failed to load SteamUI.dll.
The security tools built into Windows 10 correctly detect the Steam app. The firewall and antivirus software will automatically grant it the permissions it needs to access hardware resources. When using third-party security solutions, make sure that they also do not interfere with the Steam Network Client. The program folder can be added to the list of exclusions for the antivirus. The executable files located in it (steam.exe, hl.exe, hl2.exe, steaminstall.exe, steamTmp.exe) must have permission to establish a network connection on all TCP and UDP ports.
Reinstalling the client
Method number 2 to eliminate the error Failed to load SteamUI.dll.
After making sure that nothing interferes with Steam's work, we reinstall the client.
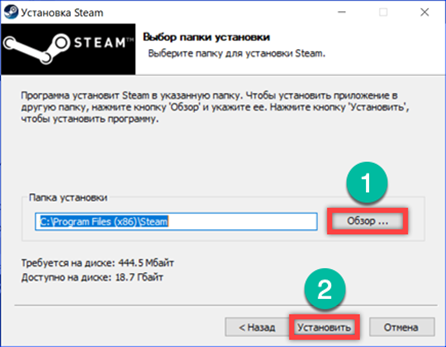
For Windows it can be downloaded from Valve's server at the following link. At the stage of choosing the path, use the 'Browse' button to indicate the folder in which the application has already been installed. If you used the default parameters, immediately click 'Install'.

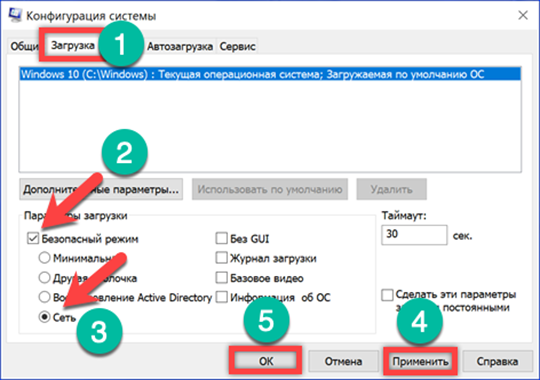
In the event that the used antivirus blocks the installer at the initial stage, the operation can be performed in safe mode. We call the 'Run' dialog box with the keyboard shortcut 'Win + R'. We type in the text box 'msconfig'. Press the 'OK' button or the enter key to run the command.

In the configurator window that opens, switch to the 'Download' tab. We set the checkboxes in the places indicated by the arrows. Apply the changes and click OK. As a result of the performed operation, the computer will boot in safe mode with support for network drivers. After reinstalling the client, we call the configuration utility again. We remove the previously installed checkboxes to return the operating system to the ability to start in normal mode.
Once launched, the reinstalled program will connect to Valve's servers and download the updates. As a result of the actions taken, the problematic dynamic library is replaced with a new version, and the error 'Failed to load SteamUI.dll' no longer appears.

Resetting the download cache
Method number 3 to eliminate the error Failed to load SteamUI.dll.
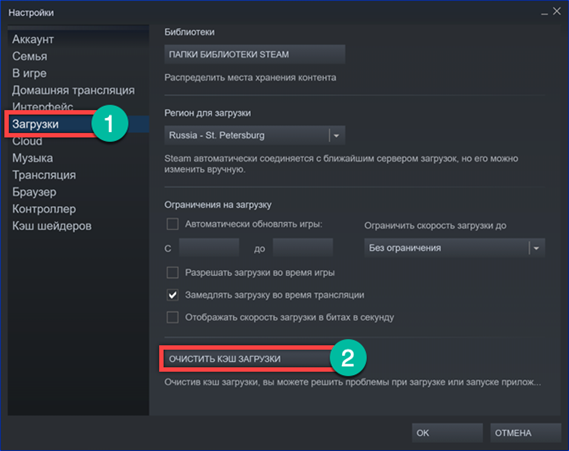
The next option involves clearing the software cache. This operation deletes the existing network settings files and reloads them from the Valve server. There are two ways to clean up.
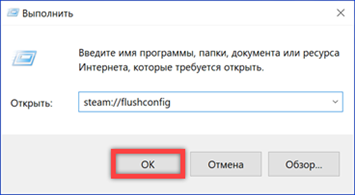
We call the 'Run' dialog box. Enter the following command 'steam: // flushconfig' in the text field. Press the enter key or the 'OK' button to start the program with the specified parameter.
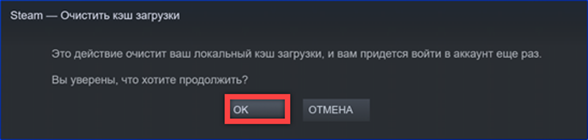
A window will appear prompting you to clear the cache. We confirm the decision.
A similar operation can be performed in the graphical interface. On the main page, we call the drop-down menu by clicking on the button in the upper left corner. Go to the 'Settings' item.

In the list of parameters, select 'Downloads'. Press the button marked with '2'. A window will appear prompting you to reset the cache described in the second step of this section.
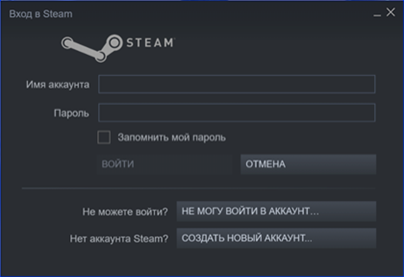
In both cases, the Steam client will restart with the reset settings. Enter the account data in the appropriate fields to enter the game profile.
Restore the library folder
Method number 4 to eliminate the error Failed to load SteamUI.dll.
Valve has officially acknowledged that some antivirus solutions can change the access rights to the installation folder as a result of incorrect determination of the ownership of program files. As a result, the user is faced with the error 'Failed to load SteamUI.dll'.
To restore the required permissions, we perform the third and fourth steps from the previous section, entering the program settings. Press the button 'Library folders'.
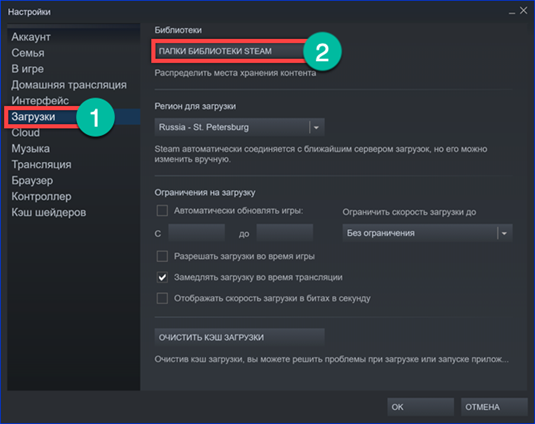
In the pop-up window, select the directory where the program is located. We call the pop-up menu for it with the right mouse button. Select the item 'Restore Libraries'. By returning access rights in this way, we get rid of the dynamic library error.

Test program activation
Method number 5 to eliminate the error Failed to load SteamUI.dll.
The latter option involves the use of beta versions and pre-release builds of the program.
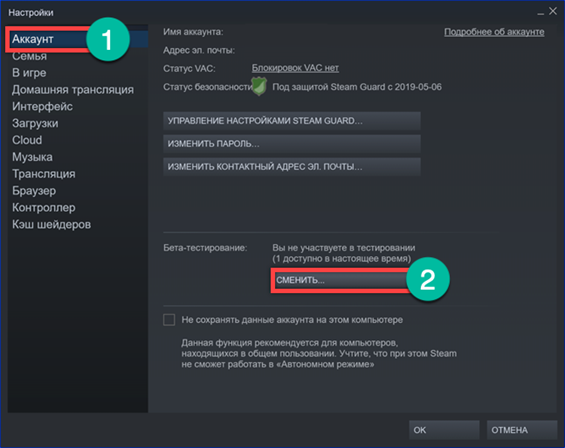
Open the Steam settings on the 'Account' tab. Click on the button in the 'Beta testing' section marked with the number '2' in the screenshot.
In the window that appears, expand the drop-down menu indicated by the arrow. We select the 'Beta Update' parameter. We confirm our consent to testing preliminary builds of the program.

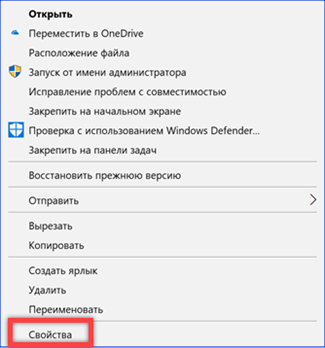
We call the context menu for the Steam client shortcut located on the desktop. Go to the 'Properties' item.
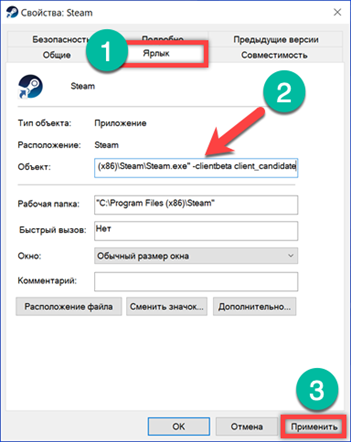
Moving to the 'Shortcut' tab, place the cursor in the 'Object' field. After the path to the program, enter a space and type '-clientbeta client_candidate'. We apply the changes made.
Click 'Continue', recording the changes made in the parameters of the shortcut. Steam will update to beta the next time you launch.

Faced with the error 'Failed to load SteamUI.dll', go to the properties of the shortcut. We remove the records previously entered in the 'Object' field, returning it to its original state. During execution, a computer restart may be required to flush the local program cache. As a result, the client will switch to a stable build and update the dynamic libraries, thereby returning access to game resources.
Finally
Methods tested by our experts allow you to get rid of the error 'Failed to load SteamUI.dll' and restore access to your account.


