
On the computer, as in any workplace, it is periodically required to carry out a 'general cleaning' to restore order. Disassemble the old, delete the unnecessary, send something to the 'cloud'. Performing these steps on a regular basis will keep the hard drive's performance within optimal limits. Testing shows that SSD occupancy should not exceed 75% of total capacity. For HDD, this value can be 80-85%. Our experts show you how to free up space on the C drive in Windows 10 and keep it at an optimal level.
Memory control
To manage and automate disk space cleaning Microsoft, I implemented a memory control function in the operating system.
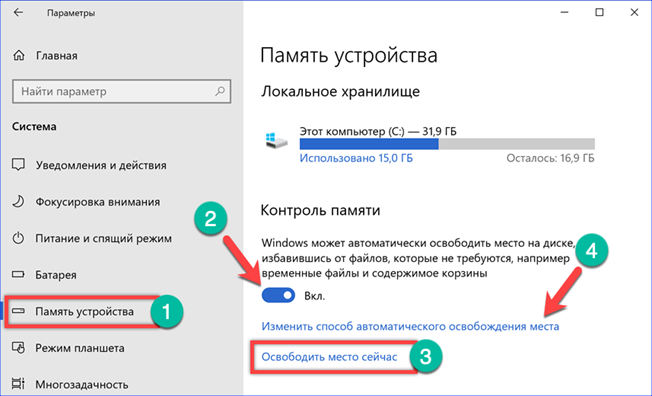
Open the parameters Windows with the 'Win + i' keyboard shortcut. Go to the section indicated in the screenshot.

In the navigation area, select 'Device memory'. Turn on the switch indicated by the number '2' to use automation. To quickly clean up disk space, use the 'Free up space now' hyperlink. Above it is the setting for automatic actions. Let's take a closer look at both functions.
After analyzing the contents of the local storage, the system displays a list of files that can be removed painlessly. Using the switches marked with arrows, you can make changes to it, adjusting the amount of space to be cleaned. The screenshot underlines the total size of the selected temporary files and the size of the regular update copies. By pressing the 'Delete' button, we clear the C drive from the accumulated 'garbage'.

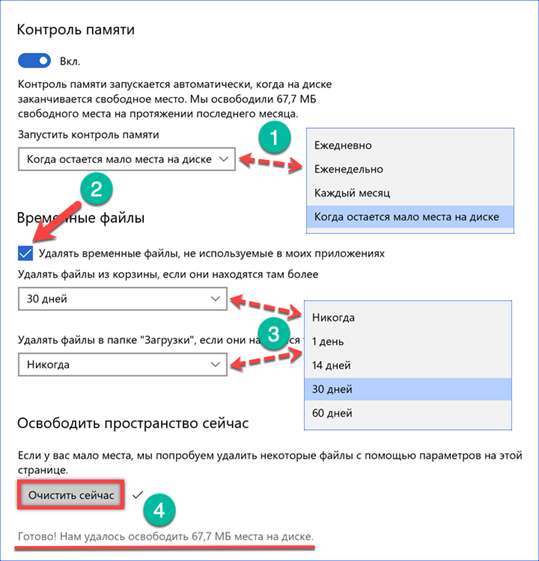
In the Automation Management section, you can configure manual deletion of temporary files. The dropdown menu for this item is marked with a '1'. Options provide for regular cleaning at specified intervals or when the level of free space is critically reduced. The number '2' in the screenshot shows a switch that activates the deletion of files from the Trash and the 'Downloads' folder. The drop-down menu with the frequency parameters for these items is the same. In the screenshot, it is indicated by a three. At the very end of the section, there is a quick delete button. The operation is performed using the parameters specified in it.
Changing storage location
When the system has two hard disks or one is divided into several partitions, it is possible to define a new storage location for user files.
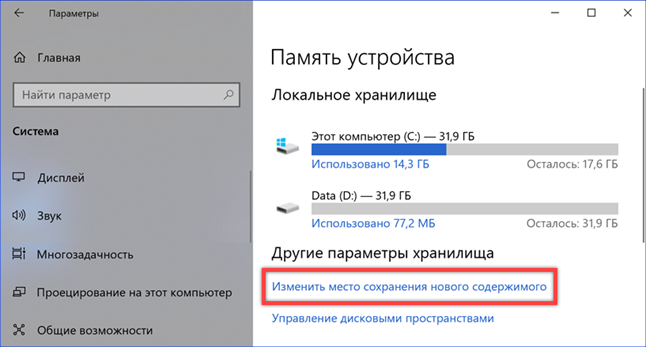
In the OS settings section discussed above, scroll through 'Memory Control' and find the 'Other storage parameters' item. Click the hyperlink marked in the screenshot.
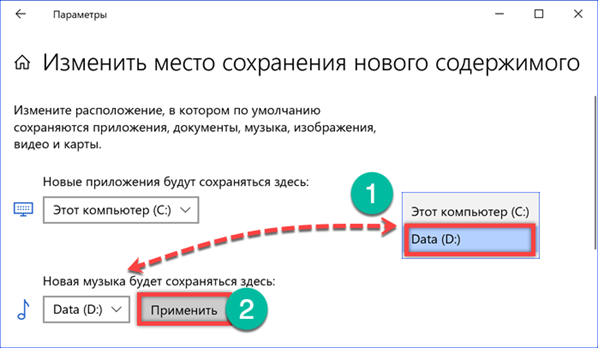
Using the drop-down menus located here, you can assign a new location for each folder included in the user's profile (music, photos, documents, movies). Information that takes up space but does not require constant access will be stored on the second drive. As a result of the actions taken, a folder with a username and access rights similar to the main one will appear on the D drive.
In order for the created data transfer scheme to start working, you need to specify the new location of the selected directories in Explorer. Select the folder in the quick access area and call the context menu. Open the 'Properties' item.

Go to the 'Location' tab. The existing path to the selected folder is listed here. Click the 'Move' button.
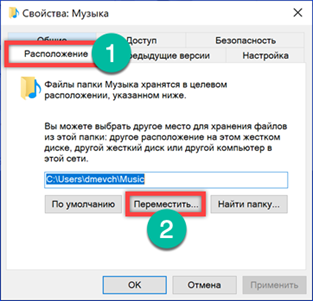
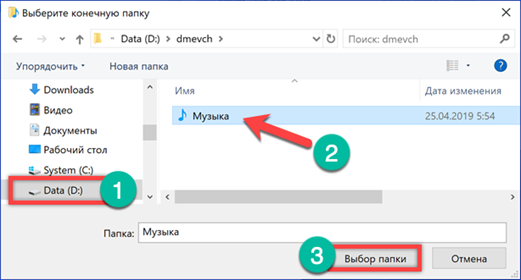
Go to the D drive, open the directory with the username and specify the folder to combine in it. We complete the operation by clicking on the button indicated by the three.
After setting the path for saving musical compositions, apply the changes made.
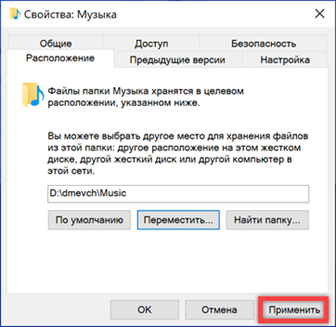
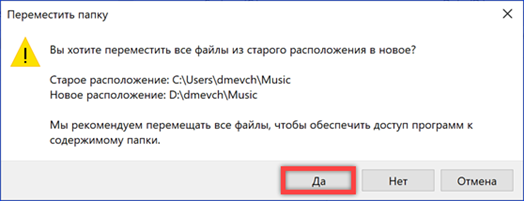
Windows prompts you to finish merging directories and move existing files to a new location. Agree by clicking 'Yes'. Once the transfer is complete, any new songs will be saved on the D drive.
Disk cleanup
The Disk Cleanup system utility has been part of the operating system for over 20 years, first appearing in Windows 98. As the predecessor to Memory Sense, it far surpasses its capabilities.
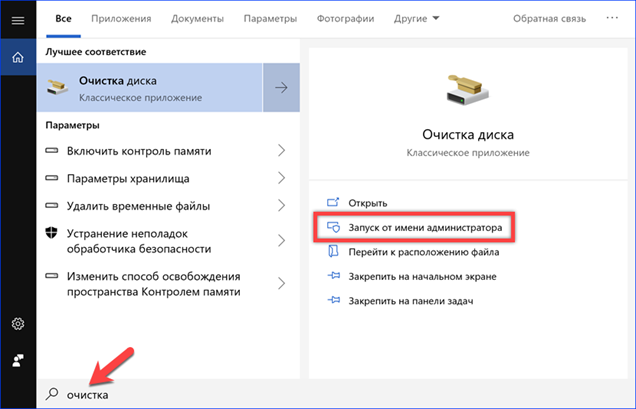
For quick access, we will use the search by typing the word 'clear' in the text box. Launch the detected program with administrative rights. Thus, we immediately get access to advanced functions.
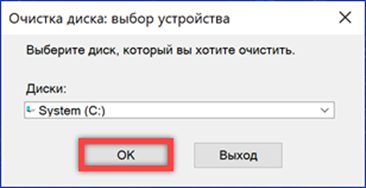
In the window that appears, select the C drive, which we are going to clean up.
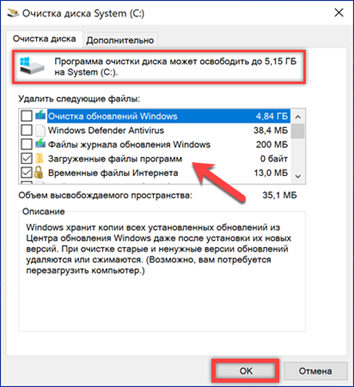
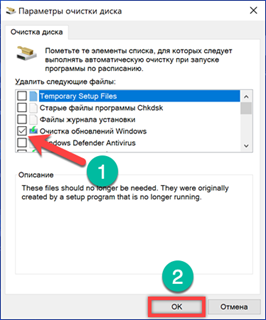
Windows will analyze the drive and return the result. At the top of the window, the total amount of disk space that can be freed is displayed. In the area indicated by the arrow, check or uncheck the boxes, selecting the files to be deleted. Click the 'OK' button.
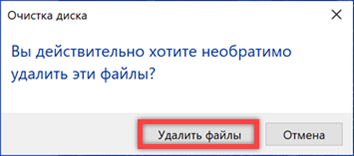
We confirm our decision to delete the selected files.
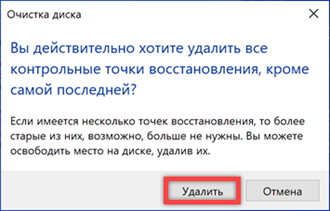
If you go to the 'Advanced' tab in the main program window, you can see two more 'Clear' buttons. The first one opens the classic menu for uninstalling programs. The second, when the 'System Protection' function is enabled, makes it possible to erase old restore points.

Since all but the most recent system snapshots are deleted, the action will have to be confirmed additionally.
Cleaning profiles
The cleanup utility supports the creation of configurations for automatic task execution. You can, for example, set a regular free disk space from copies of received updates.
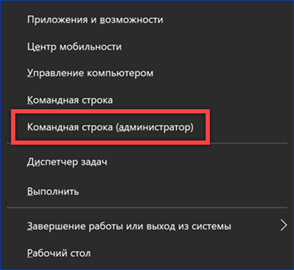
Open the extended menu of the 'Start' button with the key combination 'Win + X'. Run the command line in elevated mode.
We type the command 'cleanmgr / sageset: x'. Instead of the letter 'X', we indicate a numerical value in the range from 0 to 9999. Thus, you can create up to ten thousand different profiles.

The Disk Cleanup utility window opens. Check the boxes to mark the files to be deleted when executing the created task. Finish the work by clicking 'OK'. Re-entering the command to create a profile with a previously specified number opens the parameters window for editing.
An elevated command line is also used to run the generated script. We type 'cleanmgr / sagerun: x'. Instead of 'X' in the command text, substitute the digital value specified when creating the configuration.

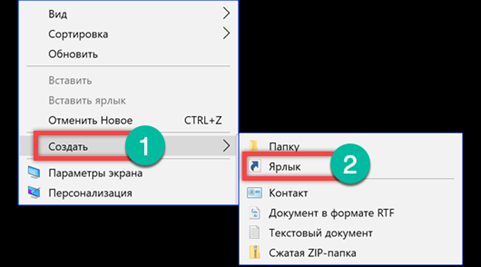
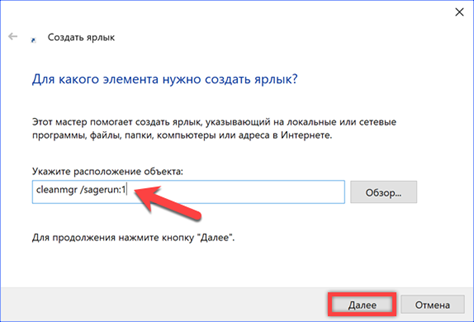
To avoid using the console to run the script, you can create a shortcut for it. Click with the mouse on a place on the desktop free of icons and call the context menu. Expand the 'Create' item and select 'Shortcut'.
In the 'object location' field, enter the 'cleanmgr / sagerun: x' command which was used in the console to run the generated script.
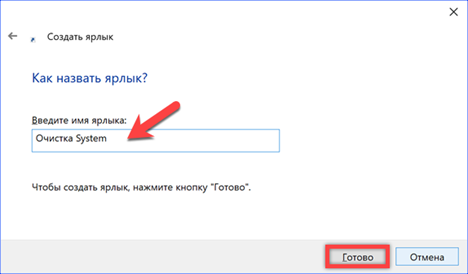
We set a name for the shortcut. Click the 'Finish' button. A new icon with the Disk Cleanup logo and the specified name will appear on the desktop. Now the generated script can be run like any application Windows, freeing up space on the C drive as needed.
Reducing the volume of recovery points
In addition to completely deleting recovery points, you can reduce the space they occupy on your drive. By default, 5% of the total capacity is allocated for these purposes, but not more than 10 GB.
We call the dialog box 'Run' using the keyboard shortcut 'Win + R'. We type in the text box 'control system'. We launch the command for execution by pressing the enter key or the 'OK' button.
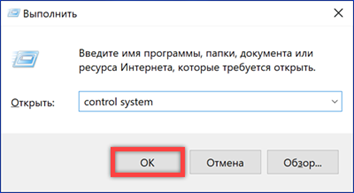
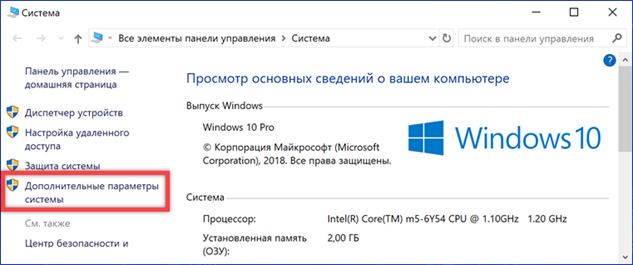
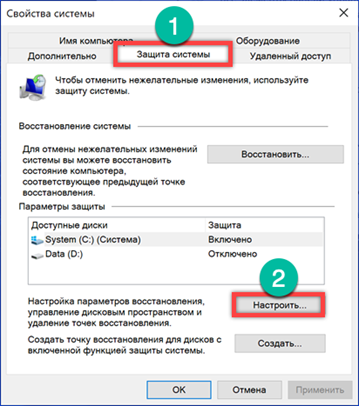
The classic system properties panel will open. In the area of quick transitions, select the section marked with a frame.
Go to the 'System Protection' tab. Click the 'Configure' button.
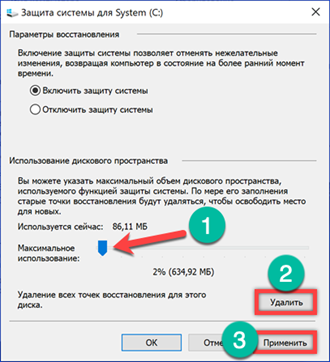
Using the slider shown by the arrow, reduce the size of the disk space allocated for saving recovery checkpoints. Above the regulator, the actually occupied volume is shown, and below the one allocated for the future. The latter is counted as a percentage of the total disk capacity. When changed per unit, the allocated size is counted in gigabytes and as it decreases in megabytes. The button marked with '2' allows you to erase all previously created points. After completing the adjustment, click 'Apply'.
Resizing the basket
Files deleted in Windows are sent to the trash by default. At the same time, not everyone regularly cleans it. For this category of users Microsoft, as part of the 'Memory control' function, I have provided a mode of automatic emptying of the basket after a certain period of time. However, manually limiting its size may be a more effective option.
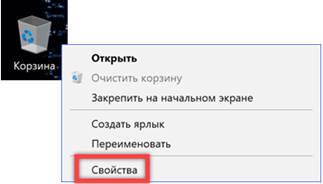
With the right mouse button, open the context menu of the basket. Select the 'Properties' item in it.
By default Windows, it allocates 10% of the disk space for storing deleted files. In order not to turn the basket into a 'pantry' for unnecessary 'garbage' we will set it to a more suitable size. Select the C drive and set the value that we consider acceptable in numbers. For example, let's choose 1 GB, reducing the occupied space by three times.

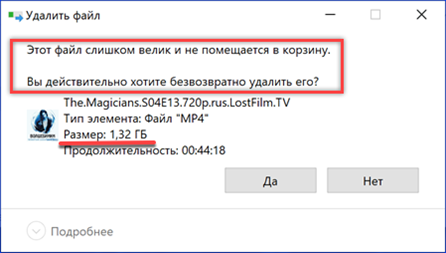
After the performed manipulations, when deleting a file whose size exceeds the value set for the basket, the system will ask for confirmation.
Disable hibernation
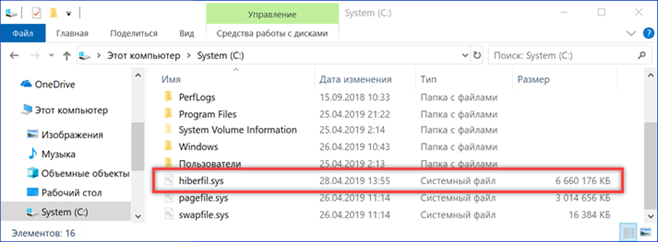
Hibernation technology allows you not to turn off your computer after you end your work session, while still minimizing power consumption. This mode of use is most relevant for laptops. Information about the state of the system before entering hibernation is written to a hidden file hiberfil.sys on drive C. On a desktop PC that shuts down after each session, it can be turned off.
The screenshot shows Explorer in the hidden files display mode and the hibernation file is highlighted. Its size is tied to the amount of RAM and is determined by the kernel power manager Windows during the installation phase. In the example shown, it is 6.6 GB. We leave the Explorer window open for visual control of the results of the operations performed.
We start the command line in administrator mode. We type 'powercfg -h off'. Hibernation will be disabled and the hiberfil.sys file will disappear from the Explorer window. The reverse is done with the 'powercfg -h on' command. The disadvantage of this method is that simultaneously with disabling hibernation, the fast startup mode of the computer is also disabled. If the result seriously affected the start time Windows, you can use another setting option.

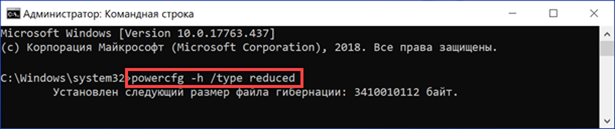
In addition to completely disabling, it is possible to limit the size of the hibernation file. At the same time, the ability to quickly start the operating system remains. Type 'powercfg -h / type reduced' on the command line. The screenshot shows that the size of hiberfil.sys has decreased by almost half compared to the original state. Now it is 3.4 GB. The initial configuration can be restored with the command 'powercfg -h / type full'.
Finally
The methods provided by our experts do not have to be used in full. To achieve optimal results on a particular computer, a combination of several methods may be required, or a simple regular disk cleaning may be enough.


