The development cycle for stable versions of the Chrome browser is six weeks. During this period, Google releases two to three interim builds. They contain minor changes and fix identified errors. New versions are loaded and changes applied automatically without user intervention. In some cases, regular browser updates may need to be disabled. Our experts talk about options for solving this problem.
Disable scheduled tasks and services
Chrome browser uses services and rules created at the time of installation to periodically check for updates.
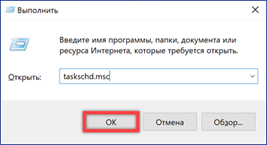
We call the Run dialog box with the keyboard shortcut Win + R. Enter 'taskschd.msc' in the text field and launch the task scheduler Windows.

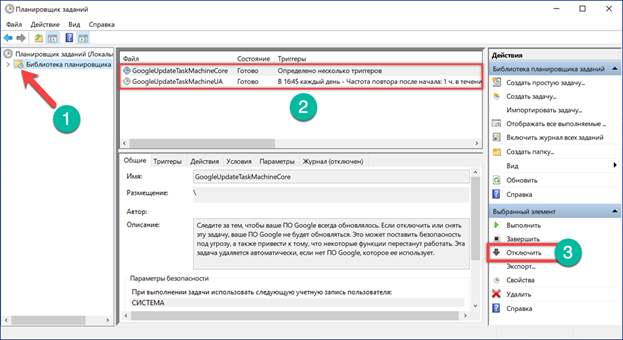
In the selection area, click on the 'Library' icon. After selecting it, the scheduled tasks will be displayed in the upper half of the central part of the scheduler window. The two shown in the screenshot are from Chrome. The first task is activated when the user logs on to the system and is responsible for checking for new versions when the browser is launched. The second is performed while the user is using Chrome and is designed to periodically search for updates hourly. Sequentially select each task and turn it off using the button marked with the number '3'.
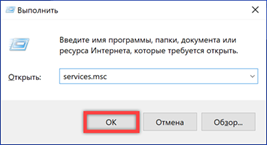
Call the Run dialog box again. Enter 'services.msc' into the text field and click 'OK'.
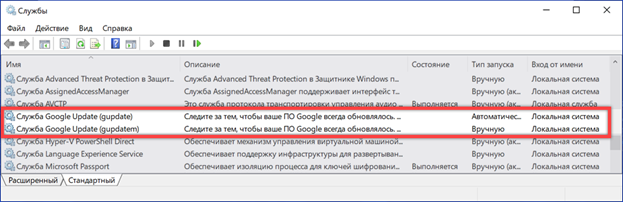
The section of the MMC console for managing system services will open. In the general list, we find two Google Update services shown in the screenshot. Double-click to open the Properties window for each.
On the 'General' tab, expand the drop-down menu indicated by the arrow. Set the startup type to 'Disabled'. Click the 'Apply' button, recording the changes made.

Changing the path to the updates folder
You can quickly turn off the search for updates by changing the name of the folder in which the Google Update executable files are stored.
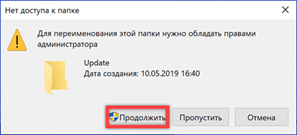
Open Explorer and go to the directory with the installed browser. Depending on the bitness of the operating system, it is located in Program Files or Program Files (x86). Find and rename the 'Update' folder. To prevent Windows from finding the executable files responsible for starting services and tasks in the scheduler, just add a minus sign to its name, as shown in the screenshot.

Performing a name change operation may require additional confirmation.
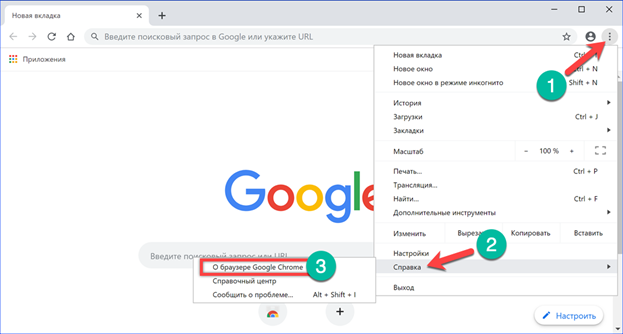
Having finished renaming, we check the result. We open the browser and call the control menu. Expand the 'Help' section and select the item marked in the screenshot with a three.
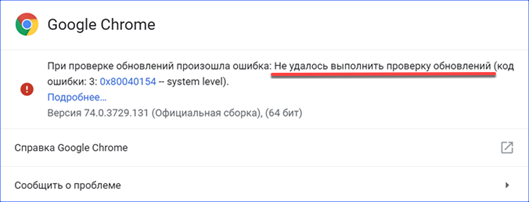
The pop-up window should contain information about the presence of errors while checking for updates.
This method allows you to quickly prevent the browser from searching for new versions, but does not give a complete guarantee that it will not be performed in the future. To achieve a reliable result, our experts recommend disabling services and tasks generated by Chrome to check for updates as soon as possible.
Configuring Group Policy
To manage the browser in a corporate environment, Google suggests using a set of administrative templates. Owners of the Windows 10 Pro, which includes the Group Policy Editor, can also download it from the Chrome help page.
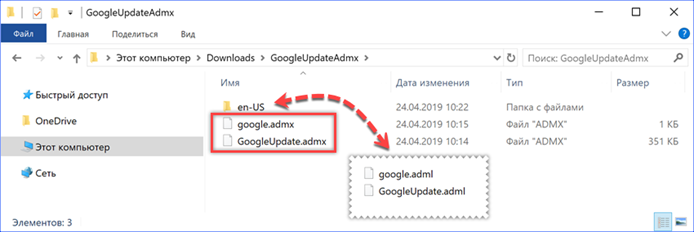
Unpack the administration set obtained as a ZIP archive. Inside there is a folder 'GoogleUpdateAdmx' whose contents are shown in the screenshot. The template (ADMX) and language pack (ADML) files must be copied to the system directory.
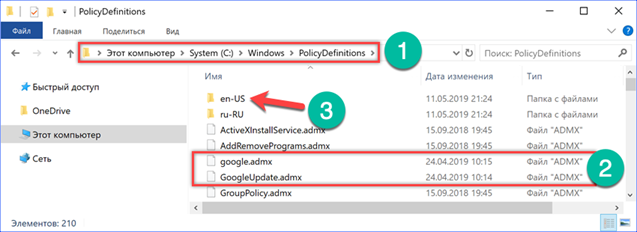
We call the 'Run' dialog box, enter the path to the required directory '% Windir% \ PolicyDefinitions' in the text field.
Explorer will open a folder containing the used Windows Group Policy templates. Copy files with the ADMX extension into it. Open the 'en-US' folder. You need to copy the language pack files with the ADML extension to it.
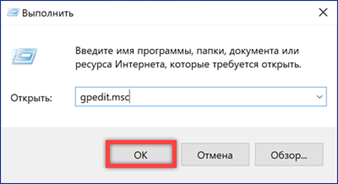
Call the Run command window again. Type 'gpedit.msc' and click OK.
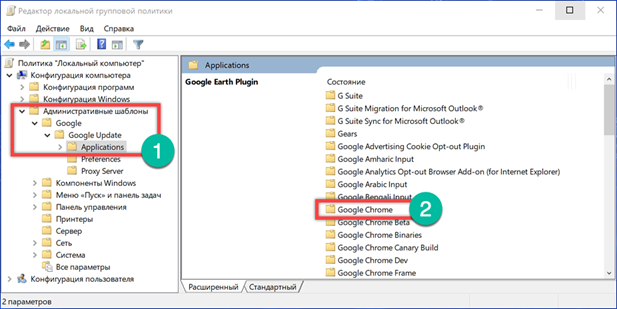
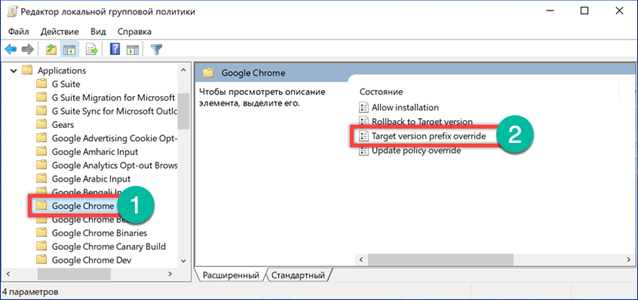
In the Group Policy Editor, open Administrative Templates in the Computer Configuration section. Sequentially expand the folders 'Google' -> 'Google Update' -> 'Applications'. Select the latter by opening its contents on the right side of the window. Find the 'Google Chrome' directory in the list and go into it.
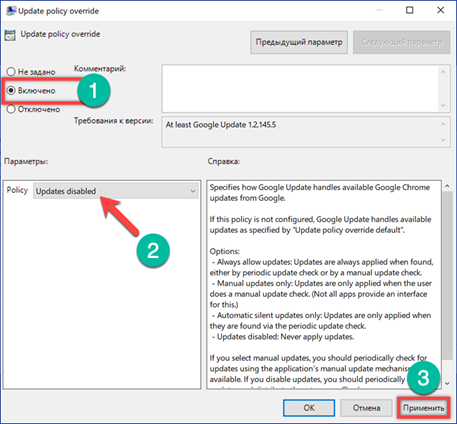
Double click on the 'Update policy override' item launching the options window.

We set the switch marked with the number '1' to the 'On' position. In the 'Options' area, a drop-down menu of four items is activated. We select 'Updates disabled' in it. We write down the changes made by clicking the 'Apply' button and close the settings window.
After completing the manipulations in the group policy editor, disable Google Update services and the rules set for Chrome in the task scheduler.
Limiting updates to the current version
Another setting for installed administrative templates allows you to restrict updates to only the current browser version.
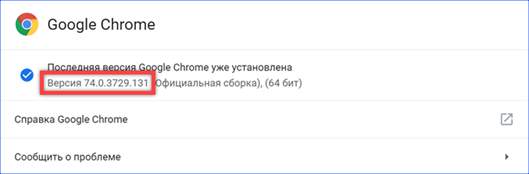
Launch Chrome and check the build number in the settings. In the screenshot, it is shown with a frame. For further actions, it is enough to remember the first two numbers.
Follow steps 4 and 5 above by opening the Group Policy Editor and navigating to Chrome Settings. Double click to call the settings for the 'Target version prefix override' item.
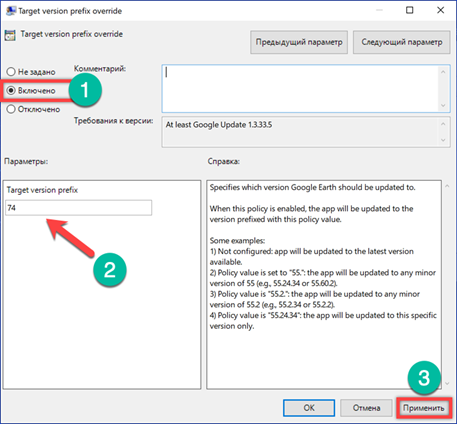
We translate the switch marked with the number '1' to the 'On' position. In the 'Options' section, a text box is activated. We enter the build number into it, which we looked at in the Chrome settings. If you specify the first two digits, as shown in the screenshot, then the browser will receive all interim fixes, but will not update to version 75. When the full number of the current build is entered in the field, Chrome stops downloading updates, considering it as the last one allowed. We save the changes made by clicking 'Apply' and close the editor.
Making changes to the registry
The last way to disable Chrome updates involves making changes to the operating system registry. It can be especially useful for the owners of the edition Windows 10 Nome who do not have the ability to use Group Policy templates.
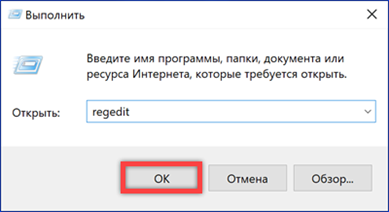
In the text box of the Run dialog box, type 'regedit'. Press 'OK' or the enter key to launch the registry editor.
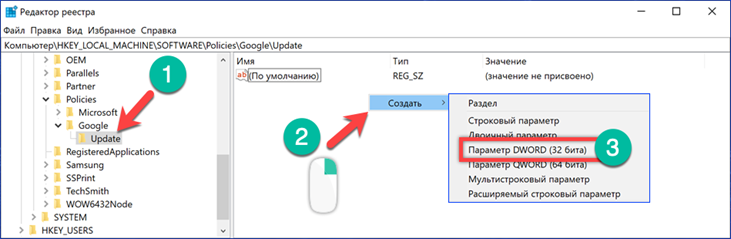
Expand the HKLM \ SOFTWARE branch by going to the folder indicated in the screenshot by the arrow. Select it and right-click to open the context menu. Sequentially select the items shown in the screenshot. Create a new folder named 'Google'. Select it and repeat the operations with the context menu. The resulting nested section is named 'Update'.

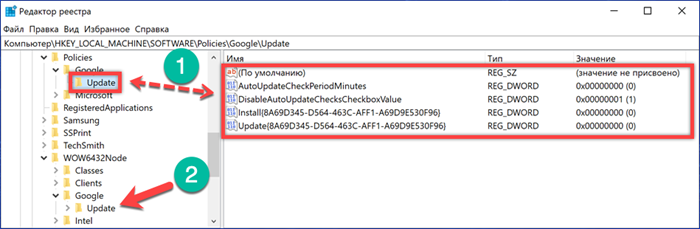
In the tree structure of the registry branches, select the last created folder. Go to the right side of the editor window. By right-clicking on an empty space, we call the context menu. We create four new parameters. We select DWORD type for all (32 bits).
Rename the created parameters and set their values in accordance with those given in the table. The final result to be achieved is shown in the screenshot.
|
Name |
A type |
Value |
|
AutoUpdateCheckPeriodMinutes |
REG_DWORD |
0 |
|
DisableAutoUpdateChecksCheckboxValue |
REG_DWORD |
1 |
|
Install {8A69D345-D564-463C-AFF1-A69D9E530F96} |
REG_DWORD |
0 |
|
Update {8A69D345-D564-463C-AFF1-A69D9E530F96} |
REG_DWORD |
0 |
If all operations are performed correctly, owners of 64-bit versions Windows have similar folders and parameters should automatically appear in the 'WOW6432Node' section. Before closing the registry editor, make sure of this.
The last step is to disable Google Update services and the rules created for the browser in the task scheduler.
Finally
Our experts do not recommend disabling updates, since their release is associated with increased security and elimination of errors identified in the program code. Nevertheless, if such a need exists, the described methods make it possible to guarantee to prevent Chrome from downloading and installing new versions.


